
Weighing the robot
· Import the following scene file from the DVD data CD: robotWars_Scale_Maya4_5.1.ma
· The rigidSolvers in each scene are separate so the rigidBodies will not interact until we combine both scenes to use the single rigidSolver node named “rigidSolver”. To do this, source the following script (included in the project scripts directory of the DVD data CD) or available for download here
source “C:\\melBotWars\\scripts\\melBotConnectToSolver.mel”;
melBotConnectToSolver;
where C: would be replaced by wherever your project is located. You should select the above commands in your Script Editor Window and middle-mouse-drag them onto a shelf to create a button for the command since you will need to use it again later.
· To make sure the script worked properly, select Solvers>Current Rigid Solver and you should only see one option called “rigidSolver”.
· Select Edit>Select All by Type>Rigid Bodies, then hold down shift and select the gravityField1 field which was included in the scale
scene from the Outliner, and select Fields>Affect Selected Objects. This will connect your robot parts to gravity.
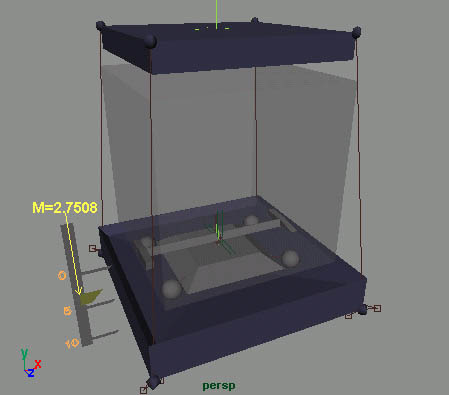
Play the simulation to see the weight of the robot, should be less than 10.0 on the scale readout to stay within the specifications. The
lighter your robot the less impulse power you will need to move it, and the quicker it will respond.
In shaded mode you can see a transparent cube to help with the maximum size limit.
· Notice gravity is 32.0 so our units are implied as feet but we will keep the Maya default units of centimeters and just call them feet
(never change the default units to anything other than centimeters).
· Select the largest part of your robot and adjust its mass
· Select all the robot's wheels and other parts and set their mass to a smaller amount than the mass of the main body
· Now if you play the simulation, the mass readout should be less than 10.0 units on the scale, preferably around 5.0.
The limit of mass is 10.0 and hopefully you were well below that. If you want to have a more agile robot make it more
light weight. Now you need to remove anything to do with the imported scale scene to save out your robot by itself.
To do this, there is a set with all the scale scene objects in it that you can select:
Edit>Quick Select Sets>Scale_ALL and hit backspace to delete all those objects.
© Copyright 2002 Habib Zargarpour